Schedule Builder
Stony Brook University provides Schedule Builder, an enhanced scheduling tool, to help students and advisors efficiently navigate the course planning and registration process.
This tool allows you to:
-
-
- Explore all possible schedule combinations based on your selected courses
- Visualize schedules in an easy-to-read weekly format
- Optimize your class schedule around your academic and personal needs
-
User Guides
Designed with the student and advisor experience in mind, these step-by-step guides will help users successfully plan, refine, and register for courses.
Student Guide to Schedule Builder
Overview
Stony Brook University provides an enhanced scheduling tool called Schedule Builder to help students efficiently navigate the course planning and registration process.
This tool allows you to:
- Explore all possible schedule combinations based on your selected courses
- Visualize schedules in an easy-to-read weekly format
- Optimize your class schedule around your academic and personal needs
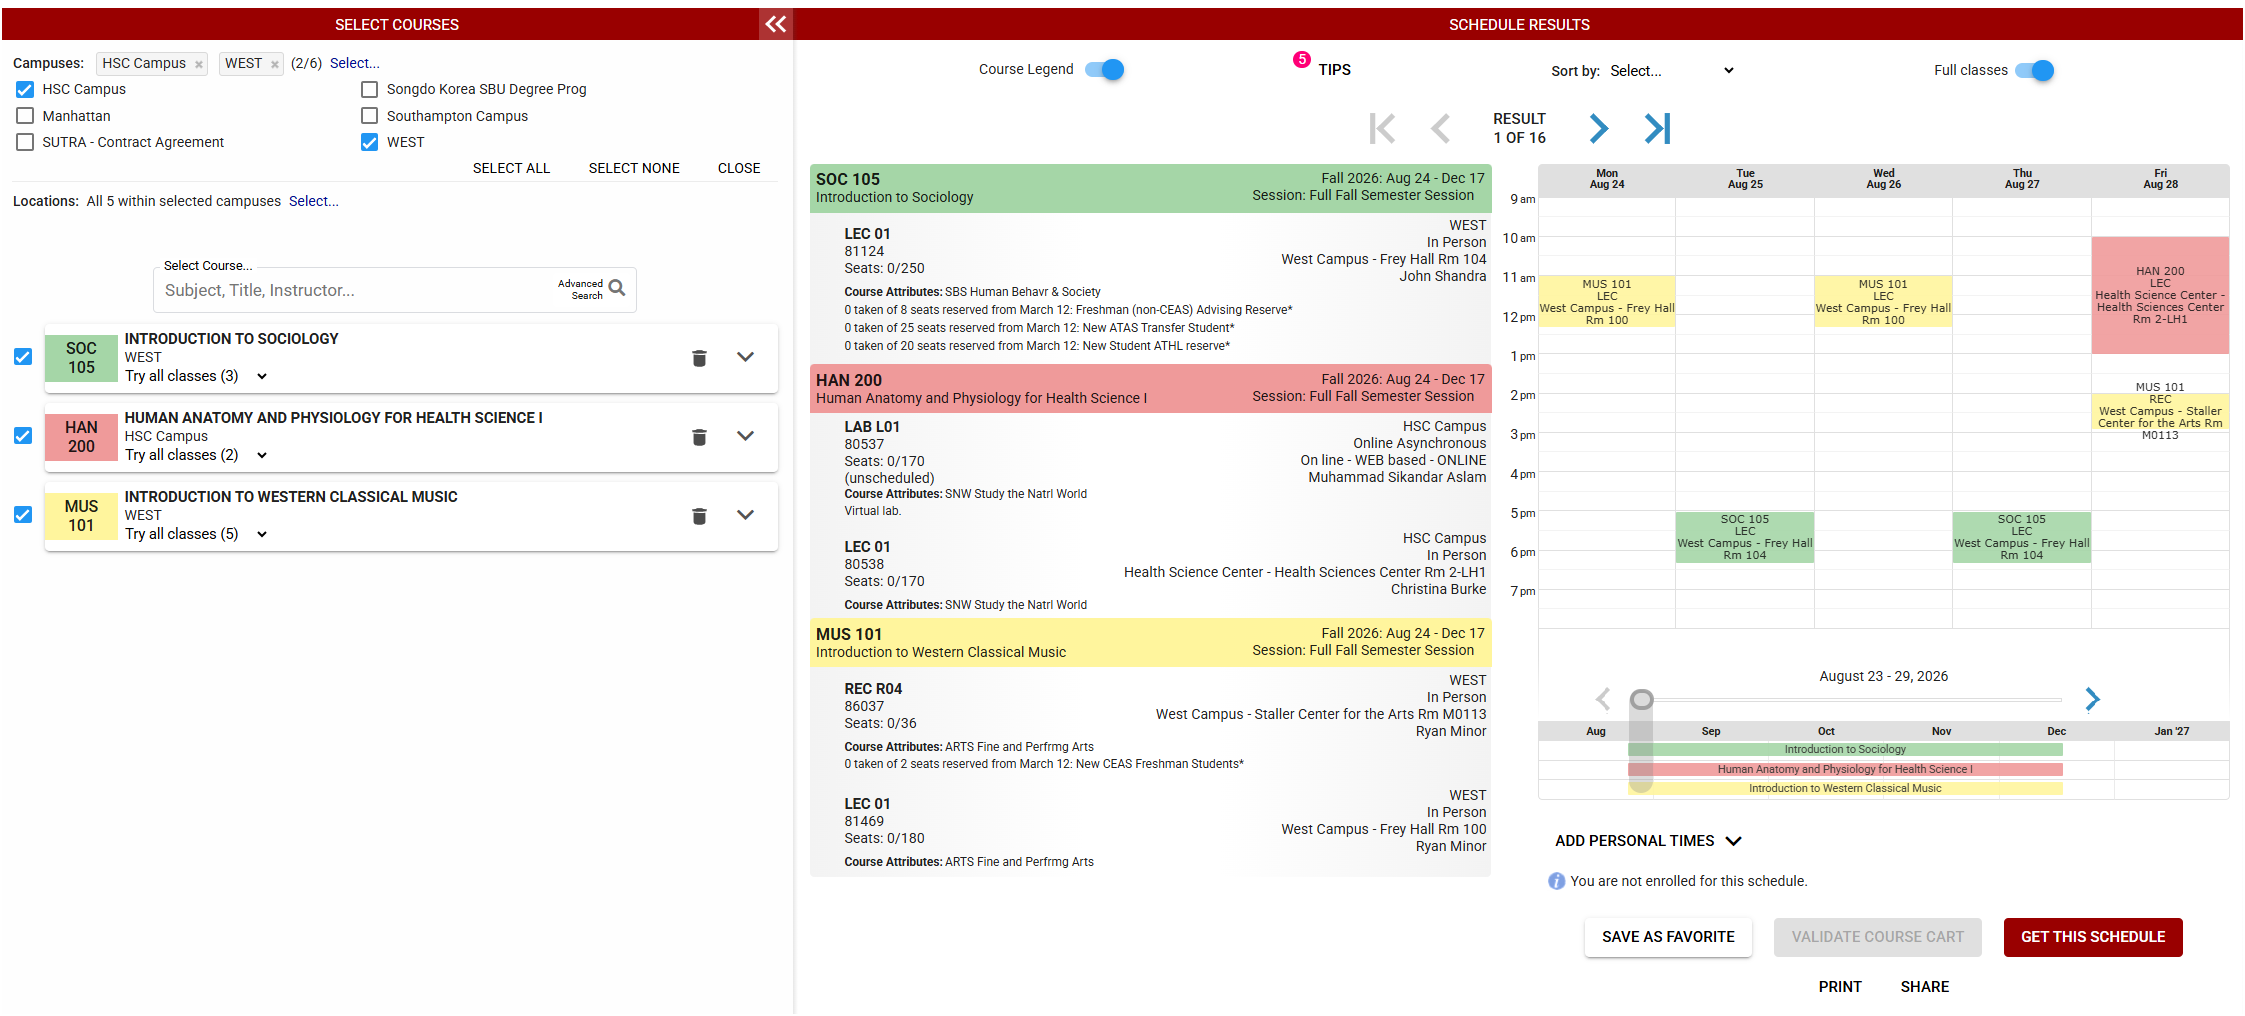
Step 1: Select Your Courses
Begin by selecting the term in which you plan to enroll.
- Use the search bar to find courses by:
- Course subject or number (e.g., BIO 202)
- Course title
- Instructor name
- Select desired courses and they will appear in your course list.
- Use Advanced Search to:
- Filter by attributes (e.g., SBC, modality, time of day)
- Browse and select multiple courses at once
Tips:
- Expand course details to review prerequisites, restrictions, and notes
- Toggle courses on/off to see how they impact your schedule options
- Remove a course anytime using the trash icon
Step 2: Review Schedule Options
Once your courses are selected, generate and review possible schedules.
You can view schedules in:
- List format (detailed course information)
- Weekly calendar view (visual timetable)
Navigation options:
- Scroll through schedules using arrows or keyboard
- Swipe on mobile devices
- Expand the schedule view for easier comparison
Turn on the Legend to better understand course details and color coding.
Step 3: Refine Your Schedule
Use built-in tools to find the best schedule for your needs:
- Pin preferred classes to keep them in all schedule options
- Filter results (e.g., fewer gaps, preferred times)
- Block off times when you are unavailable
- Sort schedules based on your preferences
These tools help you build a schedule that fits your academic goals and lifestyle.
Step 4: Save and Prepare
Before your registration appointment, you can save your preferred schedules:
- Save as Favorite (limited number allowed)
- Export to your calendar
- Print your schedule
- Share via link
Saved schedules can be revisited later to check course availability.
Step 5: Register for Classes
Registration can be completed through either Schedule Builder or directly enrolling through SOLAR.
You can:
- Click the GET THIS SCHEDULE button in Schedule Builder or send your preferred schedule directly to your SOLAR Shopping Cart
- Any errors related to enrollment will appear in either system (holds, closed claesses,
etc.) to allow you to troubleshoot or update enrollment choices.
After Registration
You can continue using the scheduling tool to:
- Add, drop, or swap courses
- Explore alternative schedules if needed
- You cannot pick GPNC Option in Schedule Builder - you must choose those options in SOLAR.
A Shared Advisor–Student Experience
Advisors use the same scheduling interface available to students, ensuring:
- A consistent user experience
- Greater transparency in schedule planning
- Reduced confusion between advisor guidance and student actions
Advisors also have access to additional tools that allow them to guide, recommend, and, where appropriate, enforce academic pathways.
Advising a Student
Advisors can act directly on behalf of a student using the “Advise a Student” feature.
By searching for a student using:
- Student ID
- Student name
Advisors can access the student’s full scheduling environment, including:
- Current enrollment
- Shopping cart (via Solar)
- Saved schedules and favorites
- Course plans
All actions taken are clearly identified as being performed on behalf of the student.
Key capabilities include:
- Building and modifying schedules
- Viewing real-time enrollment status
- Saving schedules directly for the student
Note: Depending on role permissions and university policy, some advisors may be able to add, drop, or swap classes on behalf of students (Summer 2026).
Guided Scheduling with Locking
Advisors have the ability to guide student schedules using course and class locking:
Course Locking
- Requires a student to take a specific course
- Allows flexibility in selecting sections or times
Example: Ensuring a student enrolls in a required major course
Class (Section) Locking
- Requires both a specific course and section
- Restricts students to a defined time and instructor
Example: Reserved seating cohorts, learning communities, or structured first-year pathways
Saving Advisor Recommendations
Once an advisor identifies an optimal schedule, they can:
- Save as Favorite on behalf of the student
- Clearly label the schedule as advisor-created
Students can then:
- View advisor-recommended schedules
- Accept the schedule as-is
- Adjust within allowed parameters (based on locks)
Student Engagement & Early Alerts (Summer 2026)
Depending on system permissions, advisor managers may also have access to analytics that provide insight into student behavior, including:
- Whether students are actively planning schedules
- Whether recommendations have been viewed or used
This functionality can support early identification of students who may need additional outreach or intervention.
Key Takeaways
- Advisors and students operate within a shared scheduling platform
- Advisors can guide or enforce academic pathways using locking tools
- Smart Recommendations enable scalable, strategic advising
- Integration with Solar (PeopleSoft) supports a seamless transition from planning to registration
- Analytics can help identify and support at-risk students (Summer 2026)